Set Appliance State:
| Isolate Mains Power to appliance as per TOPs P4 |
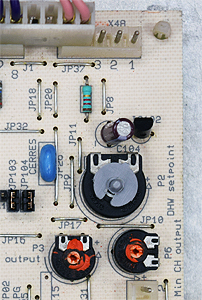
CH Demand
Remove PCB Cover
Safely connect a link between pin 1 and 2 on connector X4a
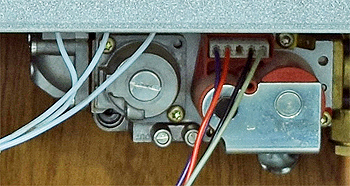
Attach U-gauge to burner pressure test point
Selector Switch in Heating & Hot Water Position
Safely connect a link between pin 1 and 2 on connector X4a
Attach U-gauge to burner pressure test point
Selector Switch in Heating & Hot Water Position
| WARNING! - Mains voltage is expected during test follow TOPs P4 live testing procedure |
Observation:
Allow the burner to ignite and establish.
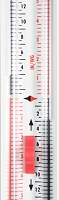
Make a note of the pressure recorded on the U-gauge.
Adjust potentiometer P3 to its minimum setting (fully clockwise).
Adjust potentiometer P6 until burner pressure reads 2.4mb
(clockwise to increase, anticlockwise to decrease).
Reset burner pressure back to initially noted pressure by turning potentiometer P3 back to its original setting.
Notes:
When U-gauge is removed test point should be checked for gas tightness.
Remove link when test is complete.


Isolate as per TOPs P4
and refit as necessary